
How to Schedule Facebook Posts to Save Time
Knowing how to schedule Facebook posts helps you:
- Save time creating individual posts
- Provide consistent content for your followers
- Connect and engage with more people
It’s a boon for any frazzled social media marketers constantly trying to keep up with posting schedules. It’s also the antidote to those sad and mostly empty Facebook pages you see where the last post was from years ago.
That’s why we want to show you how to schedule Facebook posts ahead of time to make your life easier—and drive huge engagement numbers to your Page.
And there are essentially two ways you can do it (both require a Facebook for Business Page, you can’t schedule posts to personal accounts).
- Natively. This method uses Facebook’s own posting scheduler.
- Third-party scheduler. This method leverages a social media management and posting tool such as Hootsuite.
Let’s dive into how you can do both.
Bonus: Download a free guide that teaches you how to turn Facebook traffic into sales in four simple steps using Hootsuite.
How to schedule Facebook posts on Facebook
Below is a step-by-step on how to schedule future posts for your business’s Facebook Page. To start, you need to have a Page already created.
If you don’t, don’t worry. We have an article that explains how to create your own Facebook business Page in just a few steps.
Once you have your Page, it’s time to jump into the first step.
Step 1: Create a post

Go to the top of your Facebook page’s timeline. There you will see the box where you can create a post.
Create a post for your page’s followers to see. If you need some inspiration, check out our article on creating beautiful images for your social media posts.
Step 2: Select Schedule

Once you’ve created a post, go to the drop down button next to Publish and select Schedule. That will bring you to a window that’ll allow you to select a time you want your post to go up.
Step 3: Select a date and time
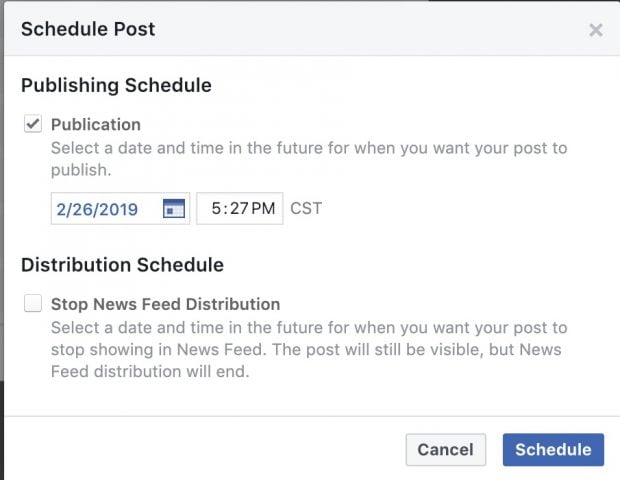
Now select the date and time you want your Facebook post to post.
This is completely up to you. However, research has shown that the best time to post on Facebook is typically between 12 p.m. and 3 p.m. Monday, Wednesday, Thursday, and Friday. On the weekends, this time changes from 12 p.m. to 1 p.m.
Step 4: Click Schedule
Click on the Schedule button at the bottom of the window and—congrats! You’ve just scheduled your first Facebook post.
Before you pop open a bottle of champagne, stand up on your desk, and make a grand speech about how much your digital marketing skills are helping the business, you might run into some issues with your post.
If that happens, you’ll have to reschedule, edit, or delete the scheduled post entirely.
How to reschedule, edit, or delete a scheduled post on Facebook
Here are some quick troubleshooting steps for when you need to change or delete a scheduled Facebook post.
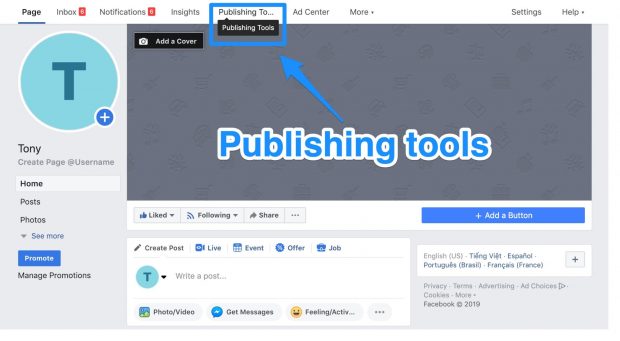
Step 1: Click Publishing Tools at the top of your Page
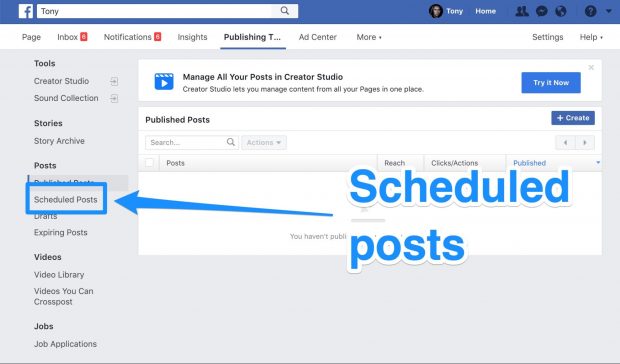
Step 2: Click Scheduled Posts in the left column
Step 3: Click the post you want to edit

Step 4: Click Edit to edit the post, or click the dropdown button to choose to publish, reschedule or delete it

Note: All times for scheduling correspond to your current timezone.
How to schedule Facebook posts with Hootsuite
If you’re looking for some sort of Facebook auto poster tool, Hootsuite’s easy-to-use scheduling functionality is here to help—just follow these easy steps.
Step 1: Click Compose Message

At the top of your Hootsuite dashboard is the box where you can compose messages. Click on that and a text box will open up where you can create your Facebook post.

Type in your message. If you need to include a link, use the link shortener to create a smaller URL.
Make sure you select the desired Facebook profile(s) from the profile picker in the left-hand box.
Step 2: Click the calendar icon

From the calendar, you’ll be able to select the date you want the message to be sent as well as the time you want it to post.

Step 3: Click Schedule

Click on schedule and your post will now be scheduled to go up on Facebook at the time you decided upon.
That’s not all you can do with Hootsuite. Below are all the different ways you can optimize your social media content calendar with Facebook using our platform.
- How to view and edit your scheduled message on Hootsuite
- How to schedule multiple Facebook posts with Hootsuite
- How to auto schedule Facebook posts with Hootsuite
Let’s jump in.
Bonus: Download a free guide that teaches you how to turn Facebook traffic into sales in four simple steps using Hootsuite.
Get the free guide right now!How to view and edit your scheduled message on Hootsuite
You might end up needing to troubleshoot your message—that’s okay! Hootsuite allows you to easily go into scheduled posts to edit, delete, or reschedule them.
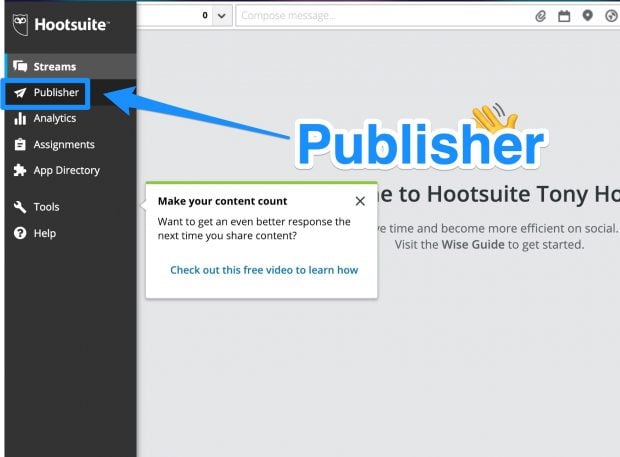
Step 1: On the left-hand side of your dashboard, click the paper airplane Publisher icon
Step 2: Click either the Planner or Content tabs

Both tabs will take you to your scheduled posts. However, the Planner tab gives you a calendar view of your scheduled posts while the Content tab gives you it all in a list. Both work for editing and rescheduling posts.
Step 3: Click on the post you want to edit
Here is how it looks in the Content tab.

Step 4: Edit your scheduled post

At the bottom you have the option on either Edit or Delete your post. Using the edit button, you can reschedule your post or edit the message’s contents. The delete button will get rid of the post entirely from your content queue.
How to schedule multiple Facebook posts with Hootsuite
Here’s how you can bulk schedule your Facebook posts on Hootsuite. Doing this will save you time and energy—not to mention give you more opportunities to directly engage with your audience.
Step 1: Select Publisher from the launch menu
Step 2: Under the Content tab, select Bulk Message Upload

Step 3: Click Choose File select your CVS file, and click Open
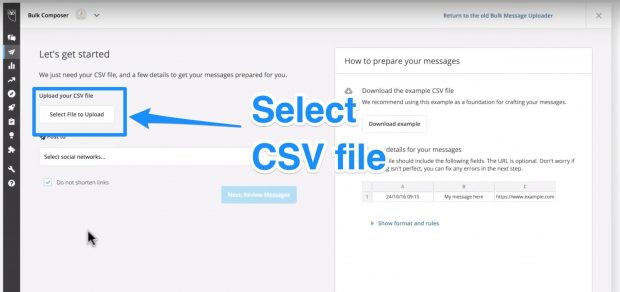
If you don’t know how to create a properly formatted CVS file in order to bulk upload, simply download the CVS file example in the box to the right hand side.
Step 4: Select date format used in the CVS file and then Review Messages

Step 5: Make sure there are no issues then click Schedule

And here’s a quick video that also explains how to schedule posts in bulk using Hootsuite (Facebook, or any social network).
How to autoschedule Facebook posts with Hootsuite
Can’t decide when to schedule your social? Use Hootsuite’s AutoSchedule feature to schedule your messages based on optimal times. This allows you to go on about your day, knowing that Hootsuite has your back when it comes to publishing at the best time.
Step 1: Click on the Calendar icon in the compose box
Step 2: Turn the AutoSchedule toggle to ON

Step 3: Click on AutoSchedule

The 7 best tips for Facebook posts
When you’re about to post a ton of social media content, remember your Facebook etiquette. Doing so will help your audience get the best content from you—and also help your business avoid a potentially embarrassing social media faux pas.
1. Stay true to your brand
Consider how your Facebook posts will appear on your followers’ News Feeds. Is it relevant and appropriate to your brand? For example, your message might not come across if you’re posting cat memes and world politics within the same hour.
2. Don’t overwhelm your audience
Avoid bombarding your Facebook audience with too much content. The same goes for duplicate posts. Don’t overwhelm your readers by sending out the same message over and over again.
3. Be mindful of what you post
Be well-informed of sensitive topics. You don’t want to be the brand posting about a big sale in the middle of a global crisis. In light of a crisis or other major event, go in and cancel or reschedule any scheduled posts that might be interpreted as insensitive.
4. Take time to craft meaningful messages
There’s a reason creating and sharing relevant content is a social media best practice that never gets old. It’s one of the best ways to boost engagement and social reach.
5. Schedule your posts at the right time for optimal engagement
The more people that see your Facebook updates, the more opportunity there is to boost engagement, drive traffic, and gain potential new followers.
Our own social team has found that the best time to post on Facebook is between 12 p.m. and 3 p.m. Monday, Wednesday, Thursday, and Friday. On the weekends, this time changes from 12 p.m. to 1 p.m.
6. Keep an eye on analytics
Knowing your target audience and your customers is the first step to crafting winning content they’ll love and knowing exactly when to post for optimal engagement.
Use Facebook’s Page Insights or other measurement tools such as Hootsuite Analytics to test and track results.
7. Know how and when to pause Facebook
You might run into a situation where you need to pause your Facebook Page.
Perhaps you accidentally made a questionable or insensitive post.
Or maybe you want to do some major redesigns of your Facebook page and you don’t want clients to see it when it’s not running at 100 percent.
Whatever the case, you can always unpublish your page and republish it again later.
From your page’s main menu, do the following:
- Click Settings
- Under “Page Visibility,” click Edit
- Select Page Unpublished
- Click Save Changes
This will make your page visible only to administrators—allowing you to make edits and changes as needed.
Hootsuite makes scheduling all your social media content easy. Manage updates and interactions on all your platforms from one place.
The post How to Schedule Facebook Posts to Save Time appeared first on Hootsuite Social Media Management.