Avoiding False Conversions in Google Analytics
Posted by R0bin_L0rd
Preface
The first half of this post is a quick rundown of some of the standard ways in which your conversions could be going awry.
The second half of this post — everything after “How to filter conversions with Tag Manager” is an advanced way of intelligently filtering conversions using Tag Manager and cookies.
If you’re confident you’ve already covered your bases, feel free just to skip to the advanced section, I just feel it’s important to go through some of the basic stuff before diving into more complex solutions.
Avoiding false conversions
Aside from failing to record important data, one of the best ways to screw up your analytics is to record the wrong thing and lump it in with all the times you’ve recorded the right thing.
For example: if you’re counting conversions when you shouldn’t be, that can screw up automated ad bidding, how much you value individual channels, or even how well you think your business is doing. For this post, we’ll be referring to this issue as “false conversions”.
There are a huge number of ways you can track conversions in Google Analytics, and a huge number of ways to screw it up. This post is going to focus on some of the main ways you can mess up conversions when you’re basing them on users completing a form and then landing on a thank-you page.
We’ll cover:
- Some useful tools
- Things to check — how might users be accidentally converting?
- How to protect destination-based goals from false conversions
- An ideal event-based goal approach
- How to protect event-based goals from false conversions
Useful tools
The tools below will help you with some of the checks in this post.
Chrome DevTools
F12 will open Chrome DevTools (you may need to press the “function” key depending on your keyboard). You can test JavaScript in “Console”, and view active cookies in “Application”.
Google Tag Manager preview
Google Tag Manager has a new preview which will show you what happens on a series of pages over time.
Adswerve dataLayer Inspector
This plugin summarizes dataLayer information in Chrome Console.
Analytics Tracking Monitor plugin
I’ve found this plugin really useful for checking what information is being sent to GA. One nice feature is being able to block hits from actually being sent to GA while recording what would be sent.
Tag Assistant
The Chrome Tag Assistant plugin will show you what Tag Manager tags are present on the page. If you click to record the session, it’ll also give you a breakdown of everything that’s happened on each page. That said — I don’t tend to rely on the recordings as much if I have Tag Manager access, because a lot of the useful information is covered between the new GTM preview and the tracking monitor plugin.
Tag Mapper
I created a free Tag Mapper tool to make it easier to see what impact Tag Manager changes might have. If you’re planning on changing something in your GTM account, you can see what else might be impacted. Likewise, if you’ve noticed that something is broken, it can help you find the root cause.
Things to check
It can be tempting to leap straight to a catch-all solution, but if you’re recording conversions when you shouldn’t be, that could be because your website visitors are doing things they shouldn’t be.
Let’s start with a quick rundown of checks you should do to make sure you’re not making the numbers look right by just ignoring problems on your site.
1. Are you only recording conversions on thank-you pages?
To check if you’re recording conversions on pages you shouldn’t be (like, every page on your site or something) have a quick look at the Reverse Goal Path report in Google Analytics:
Conversions > Goals > Reverse Goal Path.
The first column on the left should show you where your goal conversions are taking place, unless you’re doing something unusual. If you’re seeing a bunch of pages in that column which you don’t expect, that’s a sign you need to change your criteria for conversions.

One thing to bear in mind here: if you’re recording conversions based on events rather than pageviews, and you’re seeing the wrong page appearing in that left-hand column, make sure your conversion event only ever fires after your pageview.
2. Are you linking to conversion pages in other ways besides form completions?
If you’re using any goals based on a user loading a specific page (like a thank-you page), and you know you’re only recording conversions on thank-you pages, another way you could be screwing things up is accidentally linking to those thank-you pages. If a user can click on the wrong link and end up on a conversion page, you need to fix that.
One way to check for this is using a tool like Screaming Frog to crawl the site and just see if your conversion pages appear. If they appear at all, you know that’s probably a problem. To find out how to fix the problem, you can select the offending pages and check the “Inlinks” panel, which will give you a list of where you’re linking to them.

3. Are users landing directly on thank-you pages?
A quick way to check if users are landing on your thank-you pages is to use segments. If you create a segment where the landing page is your thank-you page, you can get an idea of how often Google Analytics thinks users are landing on your conversion page.
Below, you can see a screenshot of the segment interface. I’ve set it to include any session where the first interaction was a user landing on a thank-you landing page. As you can see, that was the case for 339 sessions on this site:

Once you see how often users are landing on your thank-you pages, you can pinpoint the sources which are bringing those users to the site.
Below, I’ve applied a “lands on thank-you page” segment to the Source/Medium report, and it looks like we’re getting a bunch of direct sessions, but also some CPC sessions, and organic sessions elsewhere, too:

An important thing to bear in mind here is that this is based on what Google Analytics thinks is happening. It doesn’t necessarily mean users are landing on these pages directly from adverts. In fact, in this example, we know this isn’t always the case, and sometimes it’s a symptom of our tracking code being broken or confused in another way. Even so, it gives us some things to investigate.
For example:
- Do we have adverts or other activity pointing straight to conversion pages?
- Are our conversion pages indexed in Google?
- Do we have a page in the middle of our conversion flow that isn’t being tracked?
- Is our tracking code broken, or are users doing things on-site which would confuse GA?
3.1 Do you have adverts or other activity pointing straight to conversion pages?
I won’t be able to walk you through all of this, but all advertising platforms should allow you to check active landing pages. It’s also important to make sure that you don’t have any affiliates linking directly to conversion pages — either accidentally or maliciously — as you could be paying them a lot more than they deserve.
It may be harder to check non-paid links, like social media activity. That said, it’s worth spending the time checking. If you find you’re linking to these conversion pages by accident, you can work with relevant teams to put policies in place for that in future.
3.2 Are your conversion pages indexed in Google?
Google can be a frequent cause of conversion page issues. It’s a ravenous crawler. It’ll follow links inside and outside of your site, and if there’s a machine-crawlable link to your thank-you page, it’ll probably find it.
A quick way to check if Google has saved your thank-you pages (and might be sending users straight to them) is to search for the pages in Google.
Using “site:” filters Google results to just pages on your site. Using “inurl:” filters results to just pages that contain a specific string.
Below is an example of a check we did for one of our clients. We found that they had a lot of “thank-you” pages in the index (over 600). Some of those pages were fine, but it highlighted a number of conversion pages for us to deal with:

3.3 Is your tracking code broken, or are users doing things on-site which would confuse GA?
We don’t have time to go through all the things that could go wrong here. Some things to check are:
- Are you missing tracking code on some pages? Perhaps you’re failing to record the user before they land on the thank-you page.
- Do you have different versions of Google Analytics on different pages? This can, again, cause confused or split sessions.
- Are you including UTM parameters on any internal links? Any website crawler should help you find this.
- Do you have the wrong timezone set in GA? Sessions can’t cross “midnight” — if they do, GA will split them into two separate sessions.
- Are you including important information on the thank-you page that could cause users to bookmark the page, or try to come back to it later? One solution here is to include pretty much nothing visitor-specific on the thank-you page, and assure them that you’ll email them details. It’s worth testing this to make sure it doesn’t hurt visitor confidence.
- Do you have any forms, that take more than half an hour to fill out, and don’t record interactions in the meantime? You can avoid this by splitting the form into different pages and tracking when visitors fill out a form field or when they hit errors. Entirely aside from what we’re looking at in this post, but all of these things should help you make your forms more user-friendly.
Once you have all of those checked off, you can start to look at ways to improve the way you filter your conversion data.
How to protect destination-based goals from false conversions
If you have your goal type set to “Destination” in Google Analytics, that means that any time GA records a pageview for a specific page, it’ll count as a conversion.
You can make your destination goals require users to have visited other pages first by using a funnel. If you edit the goal and switch “Funnel” on, you can specify the steps leading up to the goal. This means you can make sure that you don’t record goal conversions when users land directly on your thank-you pages.
You can also use it to separate out different kinds of goal conversions. For example, if you use the same thank-you page for multiple forms, you could have one goal where the funnel involves traveling through one form page, and another goal which involves traveling through another.

This will work if you:
- Have a smaller (and fairly static) number of different goals.
- There is a small (and fairly static) number of ways users can legitimately complete each goal.
However, funnel steps don’t allow things like regex, so they aren’t very flexible. Also, you can only use funnels with destination-type goals. So, funnels won’t help if:
- Your goals are event-based.
- You have lots of ways users could reach a goal.
- You have multiple teams managing the site, and it doesn’t make sense to keep track of all the ways users could reach a goal.
You should be aware that if you have a problem like internal UTMs or sessions timing out, these form funnels can mean you stop recording some conversions you should be. Seriously, make sure those problems are fixed.
The ideal approach: event-based goals
The ideal approach involves using event-based conversions rather than destination-based ones. You work with your developers so that as the users complete the form you tell GA that an event has occurred, rather than GA having to wait for a thank-you page pageview. GA then records each instance of that event as a Goal conversion.
Below is the criteria for one event-based goal conversion, if you haven’t seen them before and are struggling to picture how they’re set up. It records a conversion for this goal any time GA receives an event of the category “thank_you_page”:

The reason this is ideal is, you’ll only record a conversion when the user actually does what you want them to do. Most conversion goals based on pageviews are just us trying to guess what the user has done. That’s why you run into problems with destination-based goals, like users landing directly on your thank-you page without completing the form you wanted them to complete.
You might think it’s a bit strange to leave this “ideal” solution until so late in the post, but I’m doing so because this is often not the simplest solution. It can require the most work on the developer side, and you could be using something built into your CMS that your dev team has to edit, or even worse, you could be working with an external form solution that they have to hack their way into.
I’m bringing this solution up at this point because if you don’t already have this in place, you’ll need to convince someone to do it. Their first question may be “have you considered other options?” When you have that conversation, you can say:
- We’ve made sure we’re only recording conversions on the right pages.
- We’ve made sure users aren’t getting to those pages in ways we can prevent.
- We’ve made sure there aren’t other issues with how we’re tracking the site.
- Our conversion data is being polluted in a way we can’t prevent because we have to rely on thank-you pageviews.
- We can’t filter out those conversions using Google Analytics.
- The best way to make sure our data is accurate is to use events, and the most accurate events to use are ones that only occur when the user does exactly what we want them to.
- If you can help me I’ll be your best friend.
An alternative to Google Analytics funnels
It could turn out that the events-based solution above is impossible. Life has its frustrations, we soldier on.
An alternative is to switch to event-based conversions anyway and use Tag Manager to handle it all yourself. Using Tag Manager and cookies, you can create a more flexible version of GA’s funnel to only send conversion events when users land on a thank-you page having visited a qualifying page. How does that work? In short:
- When a user visits one of your qualifying pages, you put a cookie in their browser.
- When the user loads a thank-you page, you check for the cookie, and, if it exists, you send a conversion event to Google Analytics. If it doesn’t, you don’t.
- Then you clear the cookie.
That means you won’t record the following false conversions:
- Users landing direct on thank-you pages.
- Users accidentally clicking to thank-you pages when they haven’t visited the relevant form.
- Users leaving the thank-you tab open, or bookmarking it, and clicking back to it later after their GA session expires.
The section below gets into some specific Tag Manager terminology (the most confusing being that a “Custom Event” and a “Google Analytics Event” are two different things entirely).
Some terminology to know
I’ve color coded Tag Manager terminology in blue and all Google Analytics terminology in orange, but if you find yourself getting lost, you might want to read around a bit or talk to a knowledgeable colleague or consultant.
Event: Something we send to Google Analytics to record a specific action.
Custom event: Something that happens on the web page, which we can use as part of the criteria for a Tag Manager trigger.
Trigger: A set of conditions we lay out in Tag Manager. When these conditions are all fulfilled at the same time, the trigger fires and usually activates a tag.
Tag: Something in Tag Manager that does something. This sounds vague because it could be almost anything from sending an event to Google Analytics to completely rewriting the page.
Variable: A piece of information in Tag Manager that we can easily reference in triggers, tags, or other variables.
Data layer: Structured information on the page which makes it easier to pass information to Tag manager.
How to filter conversions with Tag Manager
1. Make sure Google Tag Manager is installed on your site
It’ll need to be on every page. Google has shared a Tag Manager quick-start guide if you need further guidance.
If you’re switching from standard GA code to Tag Manager, make sure you don’t include both GA and Tag Manager, or you’ll double-count.
2. Tell Tag Manager every time a thank-you page is loaded
We’ll assume your thank-you pages are all the same type of page, so you can reasonably say to your dev team, “please make this change to all of our thank you pages”. Ask them to add something like the script below.
Example script
<script>
window.dataLayer.push({
“event”: “conversion”
});
</script>
If you need to test this process before getting the devs involved, you can try adding the code yourself by pasting it into the console using Chrome DevTools.
When the page loads, that script will add information to the data layer. Tag Manager will detect the change, and you can use it as one of the conditions for a trigger. In this case, Tag Manager would detect a Custom Event called conversion as this data is added. We’ll come back to that.
3. Tell Tag Manager every time a qualifying page is loaded
We’ll also assume there are some similarities between your qualifying pages. For one thing, they’ll probably all have a form on them. You can coordinate with your dev team to automatically add/activate a script any time one of those forms is added.
Example script
<script>
window.dataLayer.push({
“event”: “qualifying”
});
</script>
In this case, you’d see a Custom Event called qualifying. Again, you can test this by pasting directly into Console.
4. Whenever a user lands on a qualifying page, set a cookie
You’ll use your “qualifying” Custom Event as the criteria for a trigger. Below is a screenshot of the trigger setup:

Then you’ll create a tag which will be activated by that trigger. The tag will add some content to the page, in this case adding JavaScript (even though the tag type specifies HTML). The JavaScript will run as soon as it’s added and set a cookie for the user, that way you can pass information from one page to another.

Example script
<script>
// Get time 30 minutes from now (this is because the default GA session timeout
// is half an hour and we want our cookie timeout to match)
var dt = new Date();
dt.setHours( dt.getHours() + 0.5 );
// Set a cookie called ‘qualified’ with the value being ‘true’ which expires in 30 minutes
document.cookie = “qualified=true; path=/; expires=”+dt;
</script>
5. Get the cookie value
Use a Tag Manager variable to make sure you’re detecting the value of the cookie, which will give you the current value of your “qualified” cookie each time you check.

6. Determine whether you should filter the conversion
In step two, you created a dataLayer event that will occur on all of your final conversion pages.
Now you create a trigger which fires on your “conversion” event.

Then create a tag which is activated by that trigger, and creates another Custom Event.

Below is the custom HTML to add. It checks if your qualifying cookie is set to “true”, which shows the user has already visited a qualifying page this session. If it is true, you create another Custom Event called “create_filtered_conversion”. If it’s false, you don’t. Either way, delete the cookie by setting its expiry time to be far in the past.
Example script
<script>
// When we are about to fire a conversion – check if we should.
// If we should – create an event that will trigger the conversion
// otherwise, don’t. Either way – clear the cookie
// Get variables
var isQualified = {{Variable – qualified cookie}}
// Check if the conversion is qualified
if (isQualified === “true”){
// If the user has a qualifying cookie
window.dataLayer.push({
“event”: “conversion_confirmed”,
});
} else {
// Do nothing if we have determined the conversion shouldn’t fire
“”
}
// Set cookie expiry in the past to clear it
document.cookie = “qualified=false; path=/; expires=Thu, 01 Jan 1970 00:00:00”;
</script>
7. Send event to GA
First you create a trigger which is waiting for that “conversion_confirmed” event.

Then you create a tag, activated by the trigger above, which sends the relevant event to GA. The specifics of the event sent to GA can be whatever you want, you just need to make sure they match the criteria of your goal in GA.

8. Don’t switch off your old conversions straight away
One nice thing about this is you can run it alongside your existing conversion tracking to see how often conversions are being filtered out. Keep your old conversion setup running for a while (how long depends on how often you get conversions).
Watch the two numbers and check if you’re filtering out loads of conversions. This check will help you spot mistakes in either the old setup or the new one.
Let me know what you think
Google Analytics will never be a perfect record of everything on your website, but these checks and processes should help you weed out some of the ways it can mislead you.
What do you think? What GA improvements do you think people have been missing? Let me know in the comments or on Twitter @robinlord8.
Sign up for The Moz Top 10, a semimonthly mailer updating you on the top ten hottest pieces of SEO news, tips, and rad links uncovered by the Moz team. Think of it as your exclusive digest of stuff you don’t have time to hunt down but want to read!
How to Make a Scalable SMS Chatbot Using Twilio, Python, and Google Sheets (with Free Code)
Posted by R0bin_L0rd
Many of us are helping businesses that are facing hard times, or we’re facing hard times ourselves. If you’re working for a company (or client) that’s in trouble, the use of SMS chatbots could be a way for you to look outside your normal list of solutions and help them succeed in a completely different way. If you’re a marketer looking for work, adding this to your list of skills could mean you keep things ticking along while many of the usual doors are closed — or that you open new doors.
What you’ll get
In this post, I give you instructions and code to produce not just one, but a series of text-based chatbots that can be managed by Google Sheets.
The example here is set up to work with restaurants, but could be adapted to work with any business that needs to receive orders, check them against inventory/menus, and note them down to be fulfilled.
Once the system is set up, there will be no coding necessary to create a new SMS-based chatbot for a new business. Plus, that business will be able to manage key details (like incoming orders and a menu) by simply updating a Google Sheet, making all of this far more accessible than most other options.
But first, some context.
Some context
In September 2017, as one of my first big passion projects at Distilled, I wrote a Moz blog post telling people how to make a chatbot and giving away some example code.
This April, I got an email from a man named Alexandre Silvestre. Alex had launched “a non-profit effort to help the local small business owners navigate these challenging times, save as many jobs as possible, and continue to serve our community while helping to flatten the curve.”
This effort began by focusing on restaurants. Alex had found my 2017 post (holy moly, content marketing works!) and asked if I could help his team build a chatbot. We agreed on some basic requirements for the bot:
- It had to work entirely within text message (and if the order was super complicated it had to be able to set up a call directly with the restaurant).
- Running it had to be as close to free as possible.
- Restaurants had to be able to check on orders, update menus, etc., without setting up special accounts.
The solution we agreed on had three parts:
- Twilio (paid): supplies the phone number and handles most of the conversational back-and-forth.
- Google Cloud Functions (semi-free): when a URL is called it runs code (including updating our database for the restaurant) and returns a response.
- Google Sheets (free): our database platform. We have a sheet which lists all of the businesses using our chatbot, and linking off to the individual Google Sheets for each business.
I’ll take you through each of these components in turn and tell you how to work with them.
If you’re coming back to this post, or just need help with one area, feel free to jump to the specific part you’re interested in:
—Pricing
—Twilio
—Google Sheets
—Google Cloud Functions
—Test the bot
—Break things and have fun
—Postscript — weird hacks
Pricing
This should all run pretty cheaply — I’m talking like four cents an order.
Even so, always make sure that any pricing alerts are coming through to an email address you actively monitor.
When you’re just starting on this, or when you’ve made a change (like adding new functionality or new businesses), make sure you check back in on your credits over the next few weeks so you know what’s going on.
Twilio
Local Twilio phone numbers cost about $1.00 per month. It’ll cost about $0.0075 to send and receive texts, and Twilio Studio — which we use to do a lot of the “conversation” — costs $0.01 every time it’s activated (the first 1,000 every month are free).
So, assuming you have 2,500 text orders a month and each order takes about five text messages, it’s coming to about $100 a month in total.
Google Sheets
Google Sheets is free, and great. Long live Google Sheets.
Google Cloud Functions
Google shares full pricing details here, but the important things to know about are:
1. Promotional credits
You get a free trial which lasts up to a year, and it includes $300 of promotional credits, so it’ll spend that before it spends your money. We’d spent $0.00 (including promotional credits) at the end of a month of testing. That’s because there’s also a monthly free allowance.
2. Free allowance and pricing structure
Even aside from the free credits, Google gives a free allowance every month. If we assume that each order requires about 5 activations of our code and our code takes up to five seconds to run each time (which is a while but sometimes Google Sheets is sluggish), we could be getting up to over 400,000 orders per month before we dip into the promotional credits.
Twilio
Twilio is a paid platform that lets you buy a phone number and have that number automatically send certain responses based on input.
If you don’t want to read more about Twilio and just want the free Twilio chatbot flow, here it is.
Step 1: Buy a Twilio phone number
Once you’ve bought a phone number, you can receive texts to that number and they’ll be processed in your Twilio account. You can also send texts from that number.
Step 2: Find your phone number
You can see your list of purchased phone numbers by clicking the Twilio menu in the top left hand corner and then clicking “Phone Numbers”. Or, you can just go to phone-numbers/incoming.

Once you see your phone number listed, make a note of it.
Step 3: Create your Studio Flow
Studio is Twilio’s drag-and-drop editor that lets you create the structure of your conversation. A studio “flow” is just the name of a specific conversation you’ve constructed.
You can get to Twilio Studio by clicking on the Twilio menu again and clicking on “Studio” under “Runtime”.

Create a new flow by clicking “Create a flow”.
When you create a new flow, you’ll be given the option to start from scratch or use one of the built-in options to build your flow for you (although they won’t be as in-depth as the template I’m sharing here).
If you want to use a version of the flow which Alex and I built, select “Import from JSON” and click “Next”. Then, download this file and copy the contents into the box that comes up.
Make sure that it starts with a single { brace, and ends with a single } brace. The box that comes up will automatically have {} in it and if you don’t delete them before you paste, you’ll double-up and it won’t accept your input.
If all goes well, you’ll be presented with a flow that looks like this:

You might be asking: What in the name of all that is holy is that tangle of colored spaghetti?
That’s the Twilio Studio flow we created and, don’t worry, it basically splits up into a series of multiple-choice questions where the answer to each determines where you go next in the flow.
Everything on the canvas that you can see is a widget from the Twilio Studio widget library connected together with “if this, then that” type conditions.
The Studio Flow process
Before we go into specific blocks in the process, here’s an overview of what happens:
- A customer messages one of our Twilio numbers
- Based on the specific number messaged, we look up the restaurant associated with it. We then use the name and saved menu of the restaurant to message the customer.
- If the customer tries to order off-menu, we connect a call to the restaurant
- If the customer chooses something from our menu, we ask their name, then record their order in the sheet for that restaurant and tell them when to arrive to pick up their order
- As/when the user messages to tell us they are outside the restaurant, we ask whether they are on-foot/a description of their vehicle. We record the vehicle description in the same restaurant sheet.
Let’s look at some example building blocks shall we?
Initial Trigger
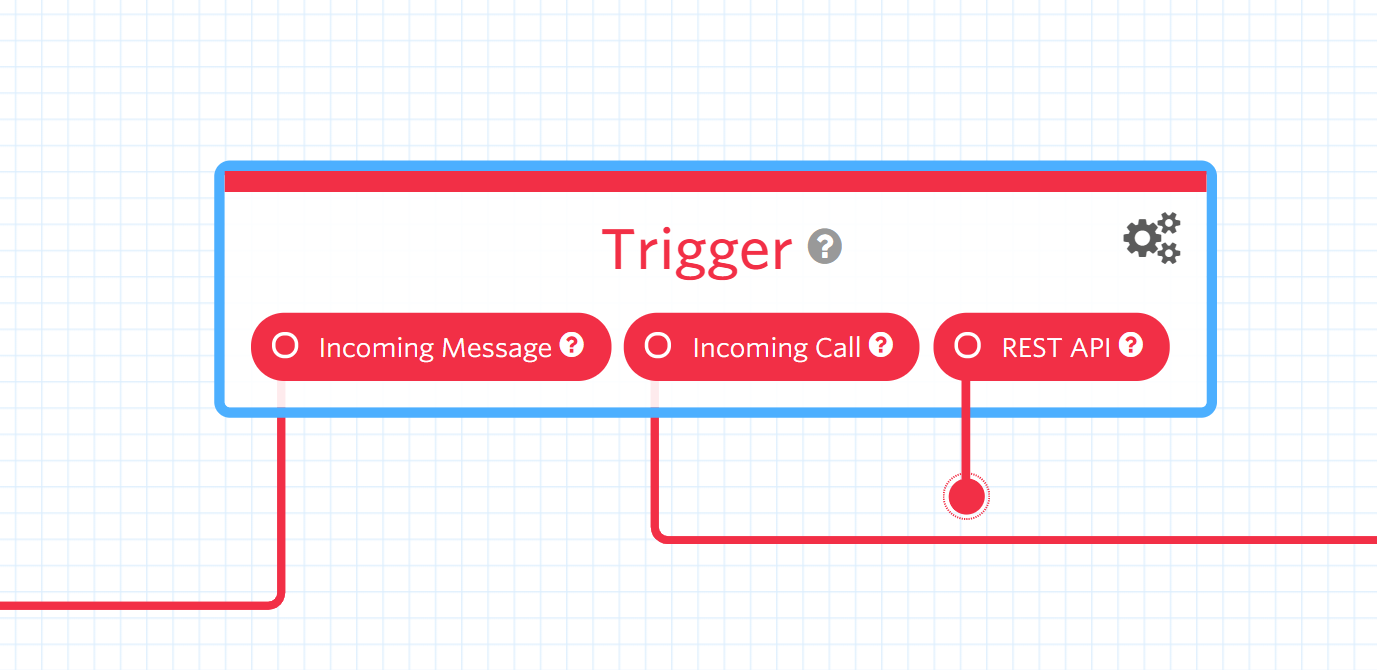
The initial trigger appears right at the start of every flow, and splits the incoming contact based on whether it’s a text message, a phone call, or if code is accessing it.
“Incoming Message” means the contact was via text message. We only need to worry about that one for now, so let’s focus on the left-hand line.
Record the fact that we’re starting a new interaction

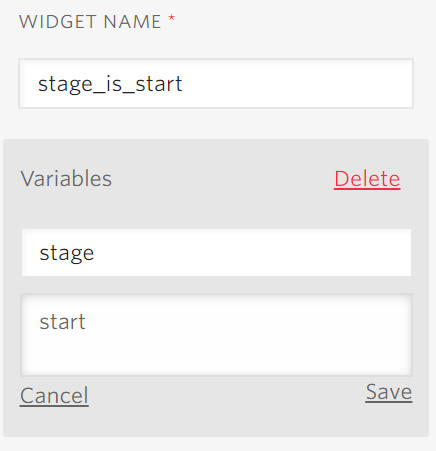
Next, we use a “Set Variables” block, which you can grab from the widget library.
The “Set Variables” block lets us save record information that we want to refer to later. For example, we start by just setting the “stage” of our interaction. We say that the stage is “start” as in, we are at the start of the interaction. Later on we’ll check what the value of stage is, both in Studio and in our external code, so that we know what to do, when.
Get our menu
We assume that if someone messaged us, triggering the chatbot, they are looking to order so the next stage is to work out what the applicable menu is.
Now, we could just write the menu out directly into Studio and say that whenever someone sends us a message, we respond with the same list of options. But that has a couple problems.
First, it would mean that if we want to set this up for multiple restaurants, we’d have to create a new flow for each.
The bigger issue is that restaurants often change their menus. If we want this to be something we can offer to lots of different restaurants, we don’t want to spend all our time manually updating Twilio every time a restaurant runs out of an ingredient.
So what we really need is for the restaurants to be able to list their own menus. This is where Google Sheets comes in, but we’ll get to that later. In Twilio, we just need to be able to ask for external information and forward that external information to the user. To do that we use a Webhook widget:
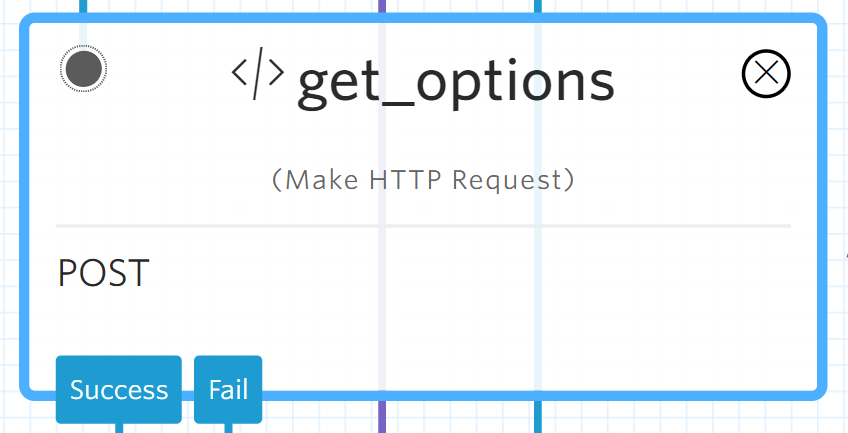
This widget makes a request to a URL, gets the response, and then lets us use the content of the response in our messages and flow.
If the request to the URL is successful, Twilio will automatically continue to our success step, otherwise we can set it to send an “Oops, something went wrong” response with the Fail option.
In this case, our Webhook will make a request to the Google Cloud functions URL (more on that later). The request we send will include some information about the user and what we need the code to do. The information will be in JSON format (the same format that we used to import the Twilio flow I shared above).
Our JSON will include the specific Twilio phone number that’s been messaged, and we’ll use that number to differentiate between restaurants, as well as the phone number that contacted us. It’ll also include the content of the text message we received and the “stage” we set earlier, so the code knows what the user is looking for.
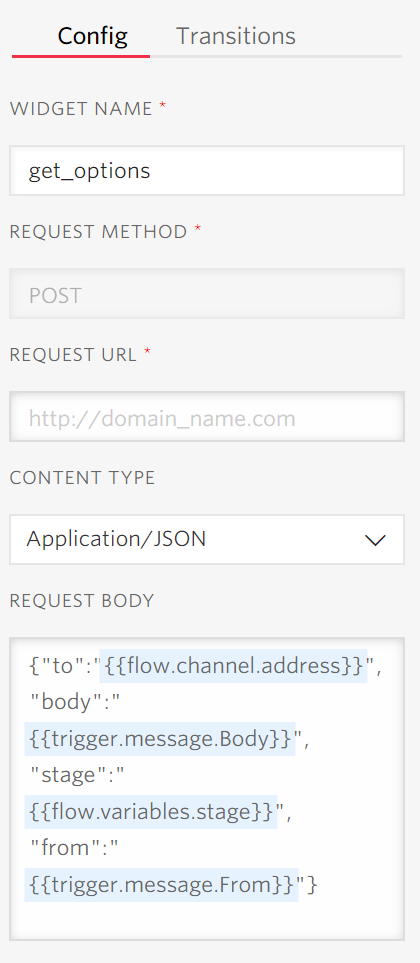
Then the code will do some stuff (we’ll get to that later) and return information of its own. We can then tell Twilio to use parts of the response in messages.
Send a message in response
Next we can use the information we received to construct and send a message to the user. Twilio will remember the number you’re in a conversation with and it’ll send your messages to that number.
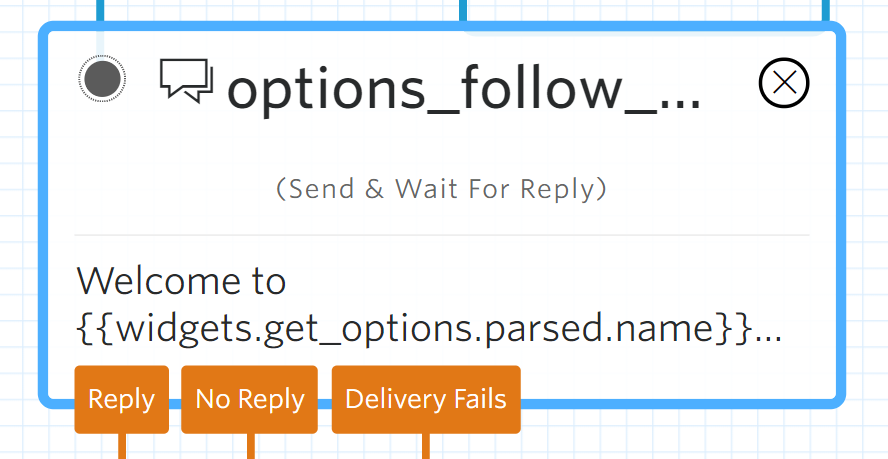
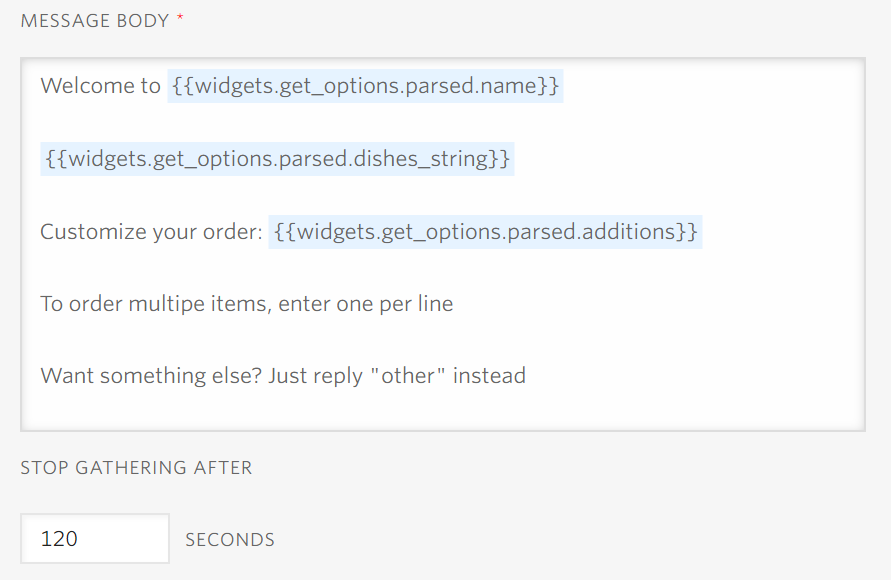
This is the “Send & Wait For Reply” widget, meaning that once this message is sent, Twilio will assume the conversation is still going rather than ending it there.
In this case, we’re writing our welcome message. We could write out just plain content, but we want to use some of the variables we got from our Webhook widget. We called that specific Webhook widget “get_options”, so we access the content we got from it by writing:
{{widgets.get_options
The response comes back in JSON, and fortunately Twilio automatically breaks that up for us.
We can access individual parts of the response by writing “parsed” and then the label we gave that information in our response. As it is, the response from the code looked something like this:
{“name”: restaurant_name,
“dishes_string”: “You can choose from Margherita Pizza, Hawaiian Pizza, Vegetarian Pizza”
“additions”: “large, medium, small”}
We get the available menu by writing “{{widgets.get_options.parsed.dishes_string}}”, and then we write the message below which will be sent to people who contact the bot:
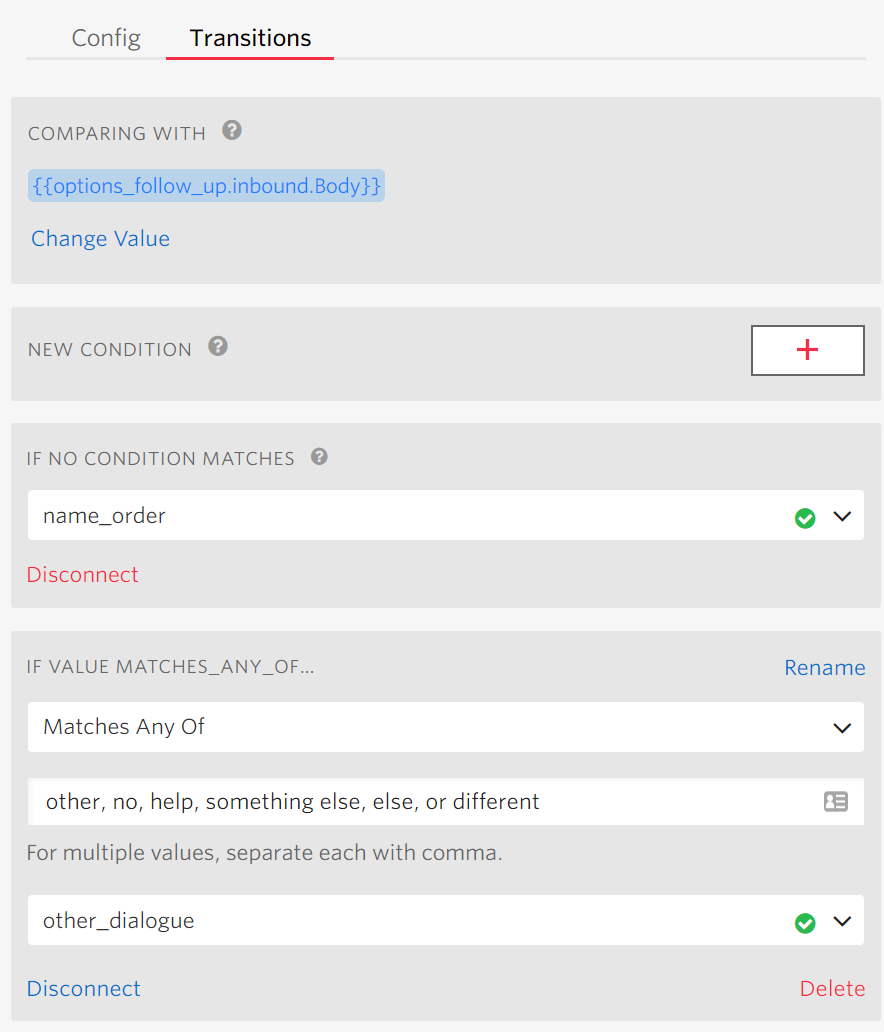
Make a decision based on a message
We can’t assume everyone is going to use the bot in exactly the same way so we need to be able to change what we do based on certain conditions. The “Split Based On…” widget is how we select certain conditions and set what to do if they are met.
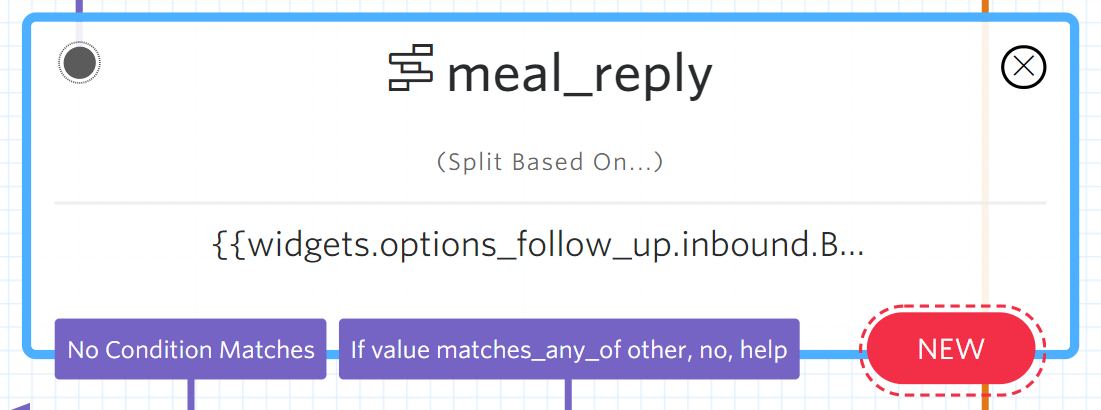
In this case, we use the content of the response to our previous message which we access using {{options_follow_up.inbound.Body}}. “Options_follow_up” is the name of the Send & Wait widget we just spoke about, “inbound” means the response and, “Body” means the text within it.
Then we set a condition. If the user responds with anything along the lines of “other”, “no”, “help”, etc., they’ll get sent off on another track to have a phone call. If they respond with anything not on that list, they might be trying to order, so we take their order and check it with our code:
Set up a call
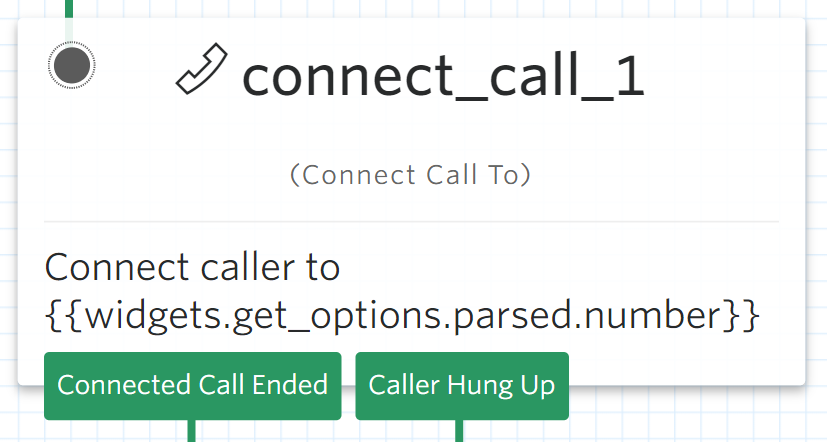
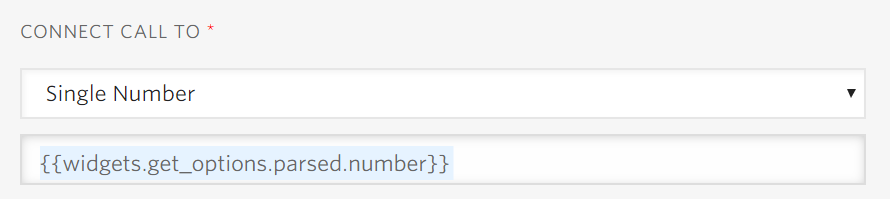
If the user says they want something off-menu, we’ll need to set up a call with the restaurant. We do that by first calling the user:
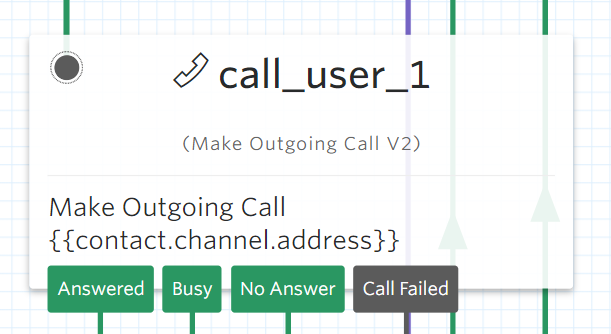
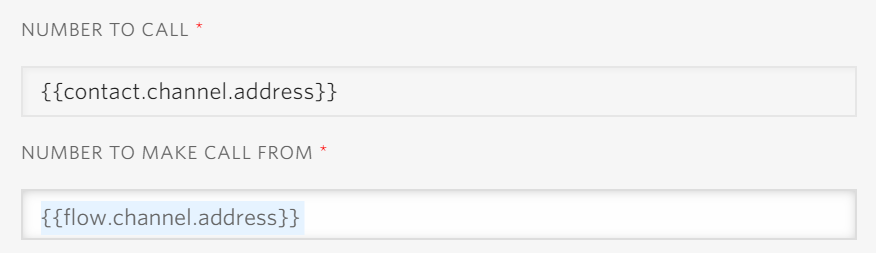
Then, when they pick up, connecting that call to the restaurant number which we’ve already looked up in our sheets:
Step 4: Select your studio flow for this phone number
Follow the instructions in step two to get back to the specific listing for the phone number you bought. Then scroll to the bottom and select the Studio Flow you created.

Google Sheets
This chatbot uses two Google Sheets.
Free lookup sheet
The lookup sheet holds a list of Twilio phone numbers, the restaurant they have been assigned to, and the URL of the Google Sheet which holds the details for that restaurant, so that we know where to look for each.
You’ll need to create a copy of the sheet to use it. I’ve included a row in the sheet I shared, explaining each of the columns. Feel free to delete that when you know what you’re doing.

Free example restaurant sheet
The restaurant-specific sheet is where we include all of our information about the restaurant in a series of tabs. You’ll need to create a copy of the sheet to use it.
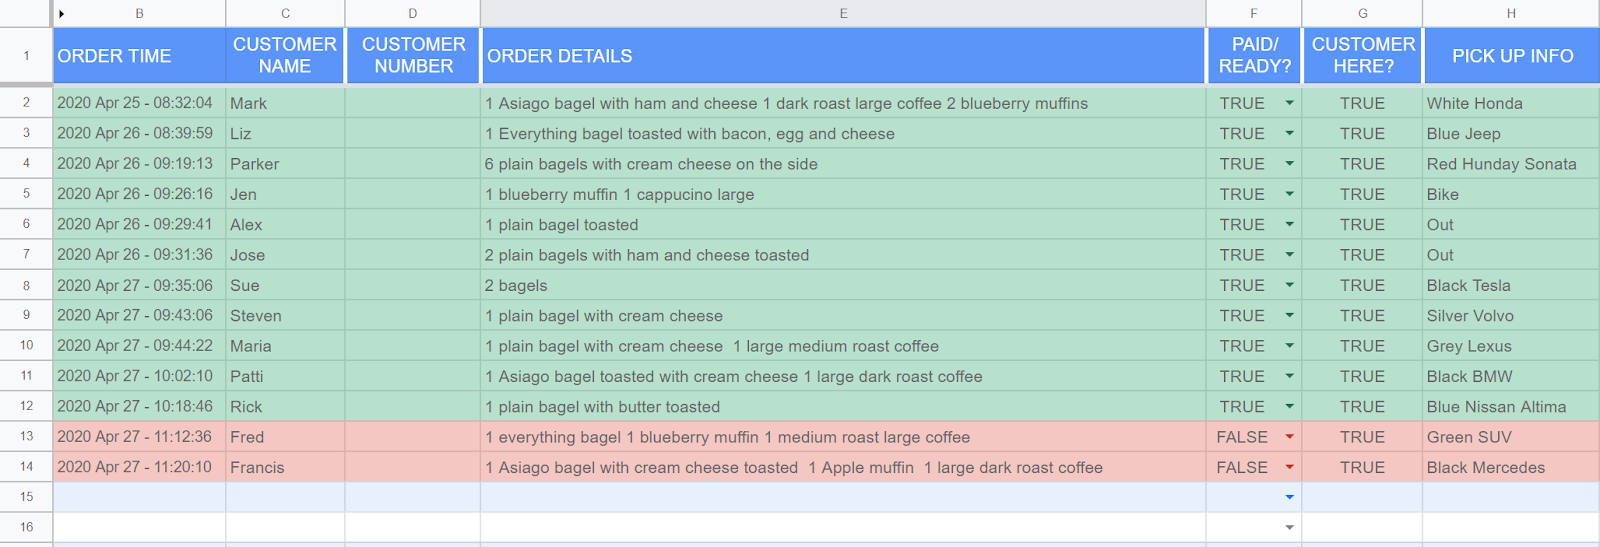
Orders
The orders tab is mainly used by our code. It will automatically write in the order time, customer name, customer phone number, and details of the order. By default it’ll write FALSE in the “PAID/READY?” column, which the restaurant will then need to update.
In the final stage, the script will add TRUE to the “CUSTOMER HERE?” column and give the car description in the “PICK UP INFO” column.
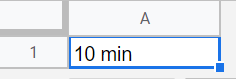
Wait time
This is a fairly simple tab, as it contains one cell where the restaurant writes in how long it’ll be before orders are ready. Our code will extract that and give it to Twilio to let customers know how long they’ll likely be waiting.
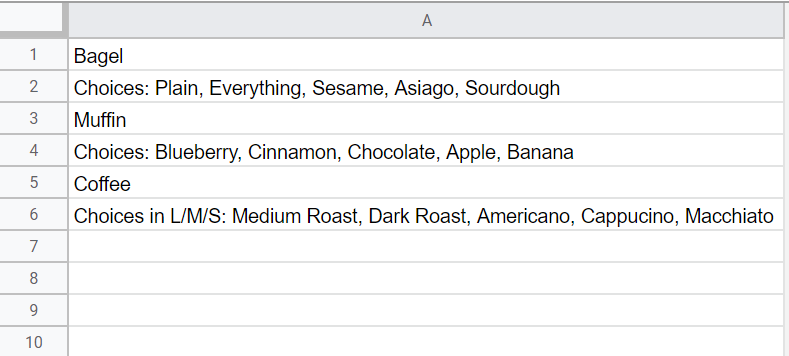
Available dishes and additions tabs
The restaurant lists the dishes that are available now along with simple adaptations to those dishes, then these menus are sent to customers when they contact the restaurant. When the code receives an order, it’ll also check that order against the list of dishes it sent to see if the customer is selecting one of the choices.
Script using sheet tab
You don’t need to touch this one at all — it’s just a precaution to avoid our code accidentally overwriting itself.
Imagine a situation where our code gets an order, finds the first empty row in the orders sheet, and writes that order down there. However, at the same time, someone else makes an order for the same restaurant, another instance of our code also looks for the first empty row, selects the same one, and they both write in it at the same time. We’d lose at least one order even though the code thinks everything is fine.
To try to avoid that, when our code starts to use the sheet, the first thing it does is change the “Script using sheet” value to TRUE and writes down when it starts using it. Then, when it’s done, it changes the value back to FALSE.
If our script goes to use the sheet and sees that “Script using sheet” is set to TRUE, it’ll wait until that value becomes FALSE and then write down the order.

How do I use the sheets?
Example restaurant sheet:
- Make a copy of the example restaurant sheet.
- Fill out all the details for your test restaurant.
- Copy the URL of the sheet.
Lookup sheet:
- Make a copy of the lookup sheet (you’ll only need to create one).
- Don’t delete anything in the “extracted id” column but replace everything else.
- Put your Twilio number in the first column.
- Paste the URL of your test restaurant in the Business Sheet URL column.
- Add your business’ phone number in the final column.
Sharing:
- Find the “Service Account” email address (which I’ll direct you to in the Cloud Functions section).
- Make sure that both sheets are shared with that email address having edit access.
Creating a new restaurant:
- Any time you need to create a new restaurant, just make a copy of the restaurant sheet.
- Make sure you tick “share with the same people” when you’re copying it.
- Clear out the current details.
- Paste the new Google Sheet URL in a new line of your lookup sheet.
When the code runs, it’ll open up the lookup sheet, use the Twilio phone number to find the specific sheet ID for that restaurant, go to that sheet, and return the menu.
Google Cloud Functions
Google Cloud Functions is a simple way to automatically run code online without having to set up servers or install a whole bunch of special programs somewhere to make sure your code is transferable.
If you don’t want to learn more about Google Cloud and just want code to run — here’s the free chatbot Python code.
What is the code doing?
Our code doesn’t try to handle any of the actual conversations, it just gets requests from Twilio — including details about the user and what stage they are at — and performs some simple functions.
Stage 1: “Start”
The code receives a message from Twilio including the Twilio number that was activated and the stage the user is at (start). Based on it being the “start” stage, the code activates the start function.
It looks up the specific restaurant sheet based on the Twilio number, then returns the menu for that restaurant.
It also sends Twilio things like the specific restaurant’s number and a condensed version of the menu and additions for us to check orders against.
Stage 2: “Chosen”
The code receives the stage the user is at (chosen) as well as their order message, the sheet ID for the restaurant, and the condensed menu (which it sent to Twilio before), so we don’t have to look those things up again.
Based on it being the “chosen” stage, the code activates the chosen function. It checks if the order matches our condensed menu. If they didn’t, it tells Twilio that the message doesn’t look like an order.
If the order does match our menu, it writes the order down in the first blank line. It also creates an order ID, which is a combination of the time and a portion of the user’s phone number.
It sends Twilio a message back saying if the order matched our menu and, if it did match our menu, what the order number is.
Stage 3: “Arrived”
The code receives the stage the user is at (arrived) and activates the arrived function. It also receives the message describing the user’s vehicle, the restaurant-specific sheet ID, and the order number, all of which it previously told Twilio.
It looks up the restaurant sheet, and finds the order ID that matches the one it was sent, then updates that row to show the user has arrived and the description of their car.
Twilio handles all the context
It might seem weird to you that every time the code finds some information (for instance, the sheet ID to look up) it sends that information to Twilio and requests it afresh later on. That’s because our code doesn’t know what’s going on at all, except for what Twilio tells it. Every time we activate our code, it starts exactly the same way so it has no way of knowing which user is texting Twilio, what stage they’re at, or even what restaurant we’re talking about.
Twilio remembers these things for the course of the interaction, so we use it to handle all of that stuff. Our code is a very simple “do-er” — it doesn’t “know” anything for more than about five seconds at a time.
How do I set up the code?
I don’t have time to describe how to use Google Cloud Functions in-depth, or how to code in Python, but the code I’ve shared above includes a fair number of notes explaining what’s going on, and I’ll talk you through the steps specific to this process.
Step 1: Set up
Make sure you:
- Have a Google account
- Go to Google Cloud Console
- Set up billing for your account (until you do, it won’t let you create functions)
- Copy the Python code from the location I linked to above
Step 2: Create a new function
Go here and click “create a new function”. If you haven’t created a project before, you might need to do that first, and you can give the project whatever name you like.

Step 3: Set out the details for your function
The screen shot below gives you a lot of the details you need. I’d recommend you choose 256MB for memory — it should be enough. If you find you run into problems (or if you want to be more cautious from the start), then increase it to 512MB.

Make sure you select HTTP as the trigger and note down the URL it gives you (if you forget, you can always find the URL by going to the “Trigger” tab of the function).
Also make sure you tick the option to allow Unauthenticated Access (that way Twilio will be able to start the function).
Select “Inline editor” and paste in the Gist code I gave you (it’s heavily commented, I recommend giving it a read to make sure you’re happy with what it’s doing).
Click “REQUIREMENTS.TXT” and paste in the following lines of libraries you’ll need to use:
- flask
- twilio
- pytz
Make sure “function to execute” is SMS, then click the “Environment Variables” dropdown.
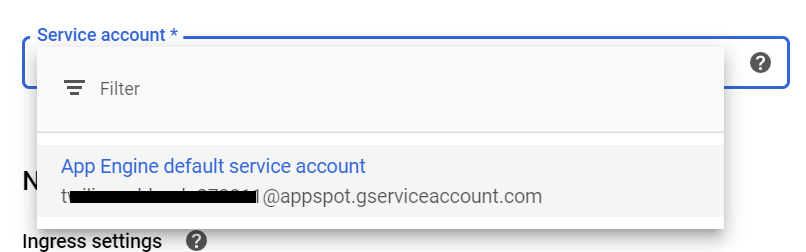
Just like I’ve done above, click “+ ADD VARIABLE”, write “spreadsheet_id” in the “Name” column, and in the “Value” column, paste in the ID of your lookup sheet. You get the ID by looking at the URL of the lookup sheet, and copying everything between the last two slashes (outlined in red below).

Click on the “Service account” drop down. It should come up with just “App Engine default service account” and give you an email address (as below) — that’s the email address you need all of your Google Sheets to be shared with. Write it down somewhere and add it as an edit user for both your lookup and restaurant-specific sheets.

Once you’ve done all of that, click “Deploy”.
Once you deploy, you should land back on the main screen for your Cloud Function. The green tick in the top left hand corner tells you everything is working.
Step 4: Turn on Sheets API

The first time your code tries to access Google Sheets, it might not be able to because you need to switch on the Google Sheets API for your account. Go here, select the project you’re working on with the dropdown menu in the top left corner, then click the big blue “ENABLE” button.
Step 5: Go back to Twilio and paste in the HTTP trigger for your code
Remember the trigger URL we noted down from when we were creating our function? Go back to your Twilio Studio and find all of the blocks with the </> sign in the top left corner:
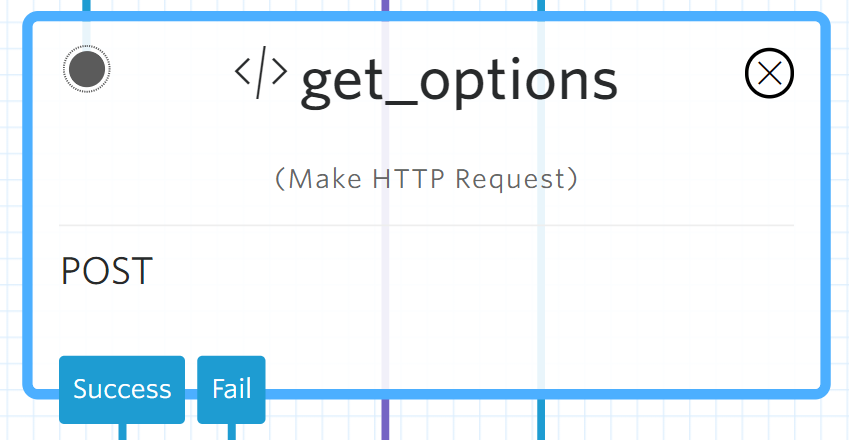
Click on each in turn and paste your Google Cloud URL into the REQUEST URL box that comes up on the right side of the screen:

Test the bot
By now you should have your Cloud Function set up. You should also have both of your Google Sheets set up and shared with your Cloud Function service account.
The next step is to test the bot. Start by texting your Twilio number the word “order” to get it going. It should respond with a menu that your code pulls from your restaurant-specific Google Sheet. Follow the steps it sends you through to the end and check your Google Sheet to make sure it’s updating properly.
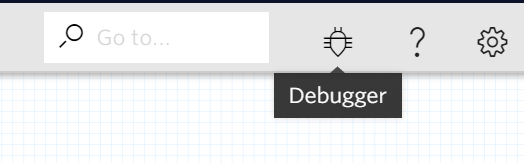
If for some reason it’s not working, there are two places you can check. Twilio keeps a log of all the errors it sees which you can find by clicking the little “Debugger” symbol in the top right corner:
Google also keeps a record of everything that happens with your Cloud Function. This includes non-error notifications. You can see all of that by clicking “VIEW LOGS” at the top:

Conclusion: break things and have fun
All of this is by no means perfect, and I’m sure there’s stuff you could add and improve, but this is a way of building a network of scalable chatbots, each specific to a different business, and each partially managed by that business at minimal cost.
Give this a try, break it, improve it, tear it up and start again, and let me know what you think!
Postscript: weird hacks
This bit is only really for people who are interested, but because we’ve deliberately done this on a shoestring, we run into a couple weird issues — mainly around requests to our bot when it hasn’t been activated for a bit.
When Twilio gets messages for the first time in a while, it turns on pretty quickly and expects other things to do so, too. For example, when Twilio makes requests to our code, it assumes that the code failed if it takes more than about five seconds. That’s not that unusual — a lot of chat platforms demand a five-second max turnaround time.
Cloud Functions are able to run pretty fast, even with lower memory allowances, but Google Sheets always seems to be a bit slow when accessed through the API. In fact, Google Sheets is particularly slow if it hasn’t been accessed in some time.
That can mean that, if no one has used your bot recently, Google Sheets API takes too long to respond the first time and Twilio gives up before our code can return, causing an error.
There are a couple parts of our script designed to avoid that.
Trying again
The first time we activate our Cloud Function, we don’t want it to actually change anything, we just want information. So in Twilio, we start by creating a variable called “retries” and setting the value as 0.
If the request fails, we check if the retries value is 0. If it is, then we set the retries value to 1 and try again. If it fails a second time, we don’t want to keep doing this forever so we send an error and stop there.
Waking the sheet up
The second time we activate our Cloud Function we do want it to do something. We can’t just do it again if it doesn’t return in time because we’ll end up with duplicate orders, which is a headache for the restaurant.
Instead, during an earlier part of the exchange, we make a pointless change to one of our sheets, just so that it’s ready for when we make the important change.
In our conversational flow we:
- Send the menu
- Get the response
- Ask for the user’s name
- Write the order
We don’t need to do anything to the sheet until step four, but after we get the user’s response (before we ask their name), we activate our code once to write something useless into the order sheet. We say to Twilio — whether that succeeds or fails — keep going with the interaction, because it doesn’t matter at that point whether we’ve returned in time. Then, hopefully, by the time we go to write in our order, Google Sheets is ready for some actual use.
There are limitations
Google Sheets is not the ideal database — it’s slow and could mean we miss the timeouts for Twilio. But these couple of extra steps help us work around some of those limitations.
Sign up for The Moz Top 10, a semimonthly mailer updating you on the top ten hottest pieces of SEO news, tips, and rad links uncovered by the Moz team. Think of it as your exclusive digest of stuff you don’t have time to hunt down but want to read!
Visualizing Time: A Project Management How-To Using Google Sheets
Posted by R0bin_L0rdThe short version of this post: Project management is a vital part of our job as marketers, but planning and visualizing projects over time is hard, so I’ve created a set of Google Sheets to make that work easier for you.
I’ve found…